
THE BEES ARE BACK IN BUCKS!
I was trying to think of a title for this blog and the song “The Boys Are Back In Town” just wouldn’t go away so I’ve adapted it!

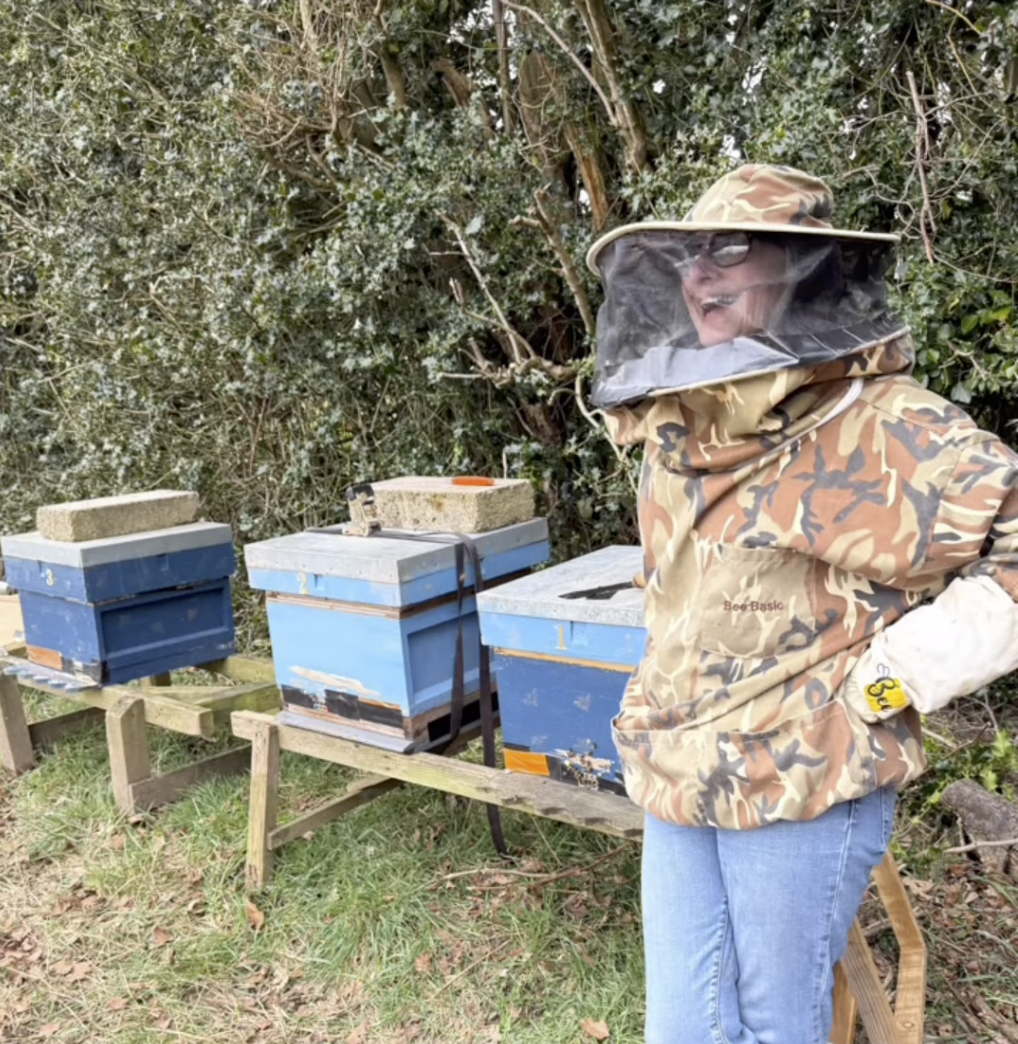
TRAVEL SCREEN ON TOP OF BROOD BOX
As you all know by now, if you follow me on Social Media, I have moved back to Buckinghamshire and so have my girls and the process of transporting them was, indeed, carefully managed to ensure their health and safety throughout the journey.
Prior to bringing them home the hives had been, at the end of last year, thoroughly inspected for any signs of disease, ensuring that only healthy colonies would be moved to their new location.
The process of moving them involved going to the apiary the evening before we were due to leave, when I knew all the bees would be inside the hives, and carefully blocking up the entrances. On top of the brood boxes I placed a special travel screen, for ventilation and airflow and safeguarding against temperature fluctuations. As I prepared the bees in the evening, obviously, I replaced the crown board and roof over night! The journey was timed to coincide with cooler hours of the day, i.e., first thing in the morning, to help reduce stress and ensure they remained calm.
Keith Patton, a friend of mine, arrived early with his Pick Up Truck and together we carefully loaded the hives onto the back and secured them down with strong ratchet straps and then loaded the stands along with other bee equipment and covered them with tarpaulin!
When we arrived in Bucks, the hives were taken back to where their great, great, great… you get the picture… great ancestors had previously lived so I knew they would be safe there. After the long journey from Herefordshire, we let them settle for a bit and when we released them they very quickly acclimatised to their new home.
Meanwhile, I’m hoping that someone in the Village I now live would like bees at the bottom of their garden… I await the knock on the door!


We’ve been incredibly lucky with the weather since we moved, for which I feel truly grateful as, not only has it made our move easier - we currently have no garage so the entire contents of our previous one is in boxes scattered around the house and very small garden - in fact the garden looks like a scene from “Steptoe And Son!” - but also I’ve been able to inspect the bees.
On one hive I am midst doing a Bailey Comb Change, on another I have done a Shook Swarm and the other one I’ve left alone.
What? I here you cry…. Let me explain.


HIVE NO. 1
The comb was tired…so in order to replace it I used The Bailey Comb Change method. You can see Phase One…click on the link…it will take you to my You Tube Chanel… https://www.youtube.com/watch?v=Ah0csrMGOm4.
Bailey Comb Change is done over a few weeks so there are more video’s to come that will eventually take you through the whole process but for now I’ll tell you how it’s done.
The Bailey Comb Change method is a beekeeping technique designed to improve hive health and productivity by replacing old comb with new, undamaged comb. This method is particularly beneficial for managing the risk of disease and ensuring that bees have the best environment for rearing brood. It should only be done on an established colony with a healthy population.
BAILEY COMB CHANGE METHOD
Start by preparing a new brood box fill it with frames with fresh foundation.
Go to the hive you have chosen for this method and carefully remove frames that they don’t need… i.e., frames with old stores or that are more or less unused. Make sure the queen isn’t on them first and then gently brush off or shake the bees back into the old brood box. Place a Dummy Board behind the remaining frames.
Put the new brood box on top of the old one, remove the same amount of frames as you did from the old brood box and place a dummy board behind these frames. Make sure the frames in the new and old brood boxes are directly aligned.
Removing the unwanted frames encourages the bees to move upwards into the new box because they don’t have much space left and the queen needs somewhere to lay her eggs so they need to draw out the fresh foundation for her to lay said eggs.
Put the crown board on top of the old brood box, followed by an empty super and feeder and feed the bees.
Keep feeding them. Don’t assume because the weather is good they have enough nectar out there. It’s early spring and they need the energy to draw out the fresh foundation.
Leave the hive alone…for about 12 days…apart from feeding them of course. It takes 9 days for an egg to develop into larvae and then a few more before the brood is capped.
Once the eggs have turned into larvae the bees will not leave that brood so you can take away the dummy board in the new brood box and add the remaining frames with the fresh foundation.
(a) Find the queen, if she’s not in the new brood box put her in a queen catcher clip and pop her in your pocket.
(b) Take the new brood box off and put to one side.
(c) Place a queen excluder on top of the old brood box, followed by a new entrance, (see the image at the bottom of the page), and block off the old entrance.
(d) Put the new brood box back on top of the new entrance.
(e) Place the queen in the new brood box.
It will take the bees a while to start using the new upper entrance, so don’t be alarmed when they arrive and don’t seem to know where to go.
The reason you do this is so the bees are storing the pollen and nectar in the right place.
Finally, in 3 weeks time, the time it takes for an egg to turn into a young bee, remove the old brood box.
Voilà… Bailey Comb Change complete!
Hive No. 3
This was my hive that had Varroa. They are doing really well, in fact this is now my strongest hive but again the comb was tired so on this hive I decided to do a Shook Swarm. I’ve never done one of these before because I think, and it’s only my opinion, it’s quite harsh. But… because this hive did have Varroa I wanted to shake all the bees off their frames and give them an instant fresh start.
SHOOK SWARM METHOD
1. Prepare a new brood box with frames of fresh foundation.
2. Remove the old brood box from it’s position and put it to one side and replace it with the new brood box.
3. Find the queen and put her in a queen catcher in your pocket!
4. Remove about four frames from the centre of the new brood box and place to one side.
5. Carefully shake each frame of bees, from the old brood box into the space you’ve created in the new brood box.
6. Once this is done, replace the missing new foundation frames and pop the queen in amongst her colony.
7. Feed the bees.
Voila! Quick to do but, of course you have lost quite a bit of brood and the stores they have been building up so you must feed them.
Click on the link to see me do the Shook Swarm. https://www.youtube.com/watch?v=tOycaB5kw-8
HIVE NO. 2
Fortunately Hive No. 2 didn’t need any foundation replacing so I have left them to their own devices and may I say they storming ahead, so much so, she has already managed to lay over 8 frames and I have added a super!
Well, that’s it… a busy start to the beekeeping year, but it always is. I’ll be fascinated to see the difference, if any, between the effect of a Bailey Comb Change and Shook Swarm has on the bees. Which hive makes the most progress? Who knows… I’ll let you know when I do!

As always I will leave you with a picture that makes me smile. This is one of my girls returning from a shopping trip, going into one of the hives laden with pollen. Clever girls…
"“Running in the wind, in the pollen and dust, a flower in flight”
(Vladimir Nabokov)

The image above is of, the oddly named, Simirie Shim. which is the extra entrance I was talking about in the Bailey Comb Change. For some reason, during the edit, when I decided to add it so you could see what I was talking about, it wouldn’t allow me to put it up with the appropriate information.
Who knows? Technology aye?